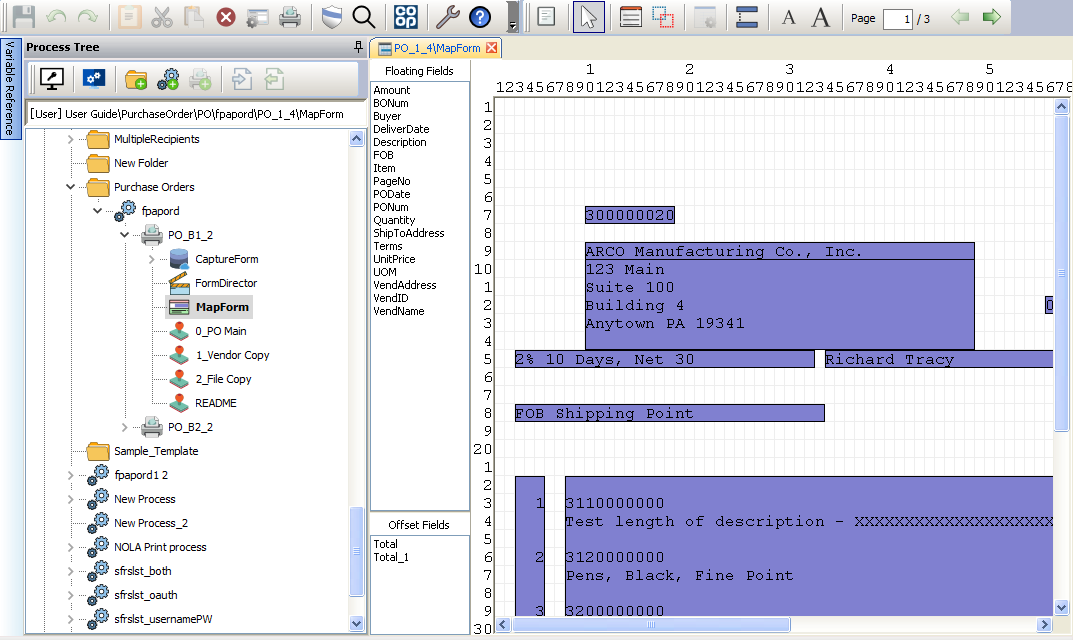
MapForm
The first step in creating a template is to add a MapForm to your print parameter. Once you have added the MapForm you can open it and import an input file from the process you are enhancing. This input file should be unmodified by any graphical package (including FormFusion). It should be in the format that the process would normally produce. Once imported, each page will be shown one page at a time. You are free to navigate through the pages as necessary. Use your mouse and draw areas (called "floating fields") on the normal printed page. Name each field appropriately to denote what information will normally appear at that location.
Example: Let's assume that you pulled into MapForm a sample Purchase Order input file. By viewing on-screen, you could highlight the "date" area on the printed form and create a field name called "PO_Date". In FormStamp you can then add a Data Field object and select the "PO_Date" field created from MapForm. Now you are free to move it to any area of the printed page. You can change the formatting characteristics such as font type, size, rotation, and location on the page. Additionally, you are free to add the field as many times as you'd like if the field must exist in more than one location.

Many of the options throughout MapForm that are available via the menus or toolbars are also available by right-clicking on objects or areas on the screen.
- Creating a MapForm - A MapForm is created under a print parameter. Select the print parameter for which you would like to create a MapForm. On the Edit menu, select New and then click MapForm. Only one MapFrom can be created for each print parameter.
- Opening a MapForm - Locate the MapForm you want to open and double-click on its name.
- Saving a MapForm - To save a MapForm, click the Save button on the toolbar.
- Renaming a MapForm - Select the MapForm you want to rename. On the Edit menu, click Rename. Then type the new name and press Enter.
- Deleting a MapForm - Select the MapForm to be deleted. Click the delete button on the toolbar. When you delete a MapForm, all data fields defined there will no longer be available in FormStamp or CaptureForm. Next time you open a form, FormFusion will warn you of the deleted fields.
- Editing MapForm Properties - On the Edit menu, click Properties. The Row and Column Count can be edited. Check the box if the pages are separated by a page break character.
Toolbar
| Button | Description |
|---|---|
|
|
This is the Fetch Sample Report tool button. Click this tool button to locate and open the file that will be the basis for this MapForm. Selecting the right sample file is important. If a sample file does not yet exist you should run the report to produce output for all possible fields and the longest possible fields. If too simple an input file is used to map data to a form, there is a potential to miss mapping certain data fields which may show up on a more complex file. When a process can produce multiple pages for a particular form, it is strongly suggested that you import a sample file with multiple pages. If the mapping appears to be misaligned on subsequent pages you may need to adjust the MapForm properties as noted above. The "lines per page" is very critical to successfully mapping the fields on a page. |
|
|
This is the Selection tool button. Click this tool button to enable data field selection in the MapForm window. Multiple fields can be selected by clicking and dragging to surround all of the desired fields. |
|
|
This is the Draw Floating Field tool button. Click this tool button to begin the task of drawing floating fields to create MapForm variables. See Floating Fields for more help on working with this field. |
|
|
This is the Decrease Font Size tool button. Click this tool button to decrease the font size of the MapForm report text. |
|
|
This is the Increase Font Size tool button. Click this tool button to increase the font size of the MapForm report text. |
|
|
This is the Edit Header/Footer Properties tool button. Click this tool button to edit the properties of the header and footer of this MapForm. See Header/Footer Properties for more detailed information. |
|
|
This is the Next Page tool button. Click this tool button to display the next report page. |
|
|
This is the Draw Offset Field tool button. Click this tool button to create an offset field on the form. See Offset Fields for more help on working with this field. |
|
|
This is the Previous Page tool button. Click this tool button to display the previous report page. |
|
|
This is the Edit Field Properties tool button. It will enable when either a floating field or an offset field is selected. Click this tool button to edit the selected field's properties. |
Note: If you do not add a MapForm beneath the print parameter, the text for the page will be displayed in a 10 pitch Line Printer font in the original locations. Once a MapForm has been created for a print parameter, only the fields placed on the form will print. All other text from the report is assumed to be un-needed and will be discarded.
Additional Topics